Easy hack to Zwift on a spin bike or Peloton
Share on:
Riding indoors with a smart trainer connected to Zwift is quite popular. Zwift is the most widely used indoor cycling app that provides a plethora of cycling options: such as riding on virtual roads, climbing famous climbs like Alpe d’Huez, focusing on interval training, participating in social rides, racing, etc.
What if you don’t have a smart trainer at home but a spin bike? Can you enjoy the wonders of riding in Zwift anyway? What about an exercise bike? A Peloton? And what to do if riding on a spin bike gives you saddle sores?
Indeed, spin bikes generally allow you to take part in live and recorded instructor-led classes. But at home, it can feel a bit lonely to ride on a spin bike and keep the motivation up. This is why in this article, we are going to see if you can join the Zwift community from your exercise bike or Peloton, and how to enjoy the perks of group rides, social events, and training plans… all in one place.
Can you Zwift on a spin bike or Peloton?
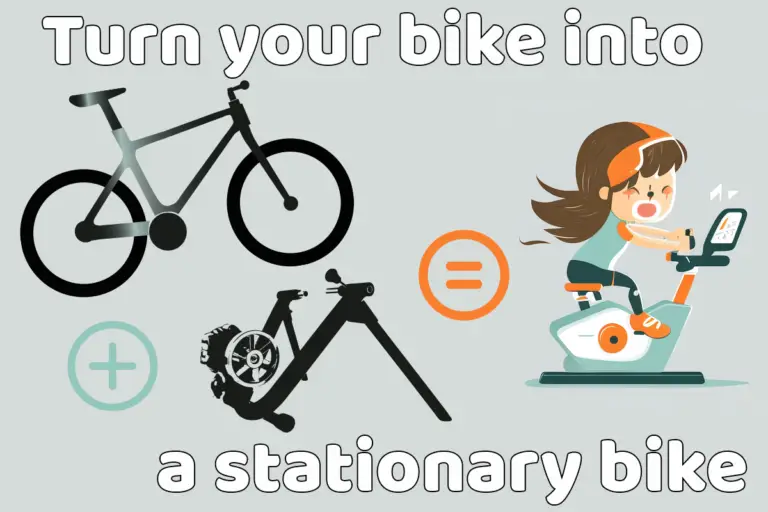
It is possible to Zwift on a spin bike or Peloton by doing some basic modifications to turn your bike into a smart bike. Your spin bike will need to communicate to an external device (laptop, phone, …) running Zwift. This can be achieved using dedicated connected sensors.
Whoever wants to ride in Zwift has to live broadcast either their power output or their speed. Without this information, Zwift will not let your avatar move in-game.
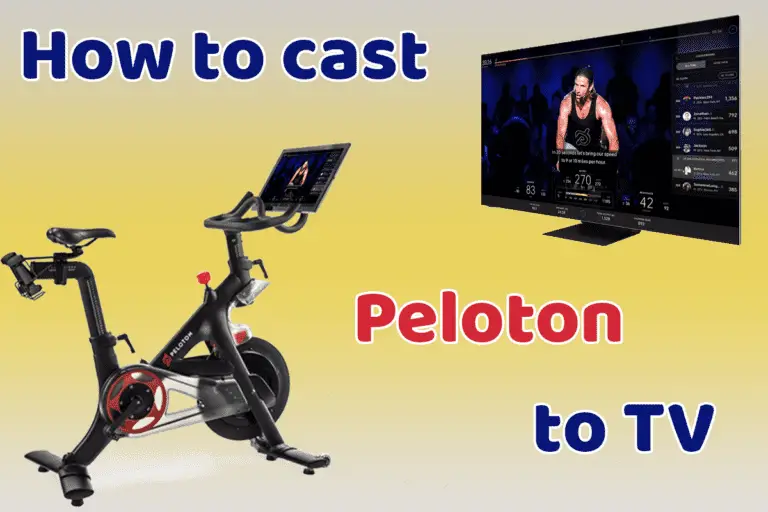
If you are using a Peloton, it’s not that easy to run Zwift on the Peloton screen without being an advanced geek. I advise running Zwift on an Apple TV instead, it will be easier and more stable.
Can you turn a spin bike into a smart bike?
You can turn a spin bike into a smart bike with a power meter. The easiest option is to replace your pedals with power meter pedals. Alternatively, you could imagine using a speed sensor. However, this cheaper option won’t be perfect on a spin bike or an exercise bike, more on that later in this article.
Want to know more about power meters? Go check my article: How power meter works.
If you are using a Peloton with an Apple TV running Zwift, the Apple TV should be able to get the power meter or speed sensor signal as long as these are Bluetooth (no ANT+ on Apple TV!).
How to connect your spin bike to Zwift?
To connect your spin bike or Peloton to Zwift, you need to buy power meter pedals to fit in lieu of the spin bike pedals. The power meter pedals will be able to measure the power you are generating while pedaling and transmit the information to an external device connected to Zwift.
Let’s see in detail how to connect an exercise bike or spin bike to Zwift, step-by-step:
1. Buy power meter pedals
There are several models available on the market of power meter pedals, with different pricing and technologies. Some models have single-sided variants: meaning they measure the power output on one side only. This is entirely sufficient for the purpose of turning a stationary bike into a smart bike to ride on Zwift.
In my opinion, the best model for this purpose are the Favero Assioma UNO pedals. They are good quality, and accurate while being cheaper than other models (around $500).
Here is a more generic list of power meter pedals if you wish to look for another model:
- Garmin Rally Series (Rally XC, Rally RS or Rally RK)
- Garmin Vector 1, Vector 2, Vector 3 (or the single-sided variants)
=> These models are no longer sold by Garmin but can be found on the second-hand market - Favero BePro or Favero Assioma pedals (or the single-sided variants)
- PowerTap P1 or PowerTap P2 pedals (or the single-sided variants)
- IQ2 pedals
- SRM X-Power
- SRM EXACT Look Pedals
- LOOK Power Pedals
- Polar Power Meter Pedals
- Wahoo POWRLINK
If power meter pedals are too expensive for you, then go directly to the section where I explain how to set up a spin bike with a speed sensor. Click here to scroll directly to the dedicated paragraph.
Power meter pedals require to use cleats. If you are a spin bike addict you most likely already use some kind of clipless shoes when riding. Generally, the spin bike pedals use the SPD system. Most power meter pedals will use the SPD-SL system (which is different). Your shoes may not be compatible with it and you may have to buy a new pair of cycling shoes.
On the other hand, the Peloton bike uses the same system that most power meters, i.e. SPD-SL / delta cleats. So you probably won’t need to buy new shoes if you plan to use a Peloton to Zwift.
And if you ever wonder why clip pedals are called clipless, find out the answer here.
2. Install the pedals on the spin bike or Peloton
Just make sure you have a 15mm pedal wrench and/or an 8mm hex wrench to swap the bike pedals with your power meter pedals. The ones from park tools are the ones I use and love:
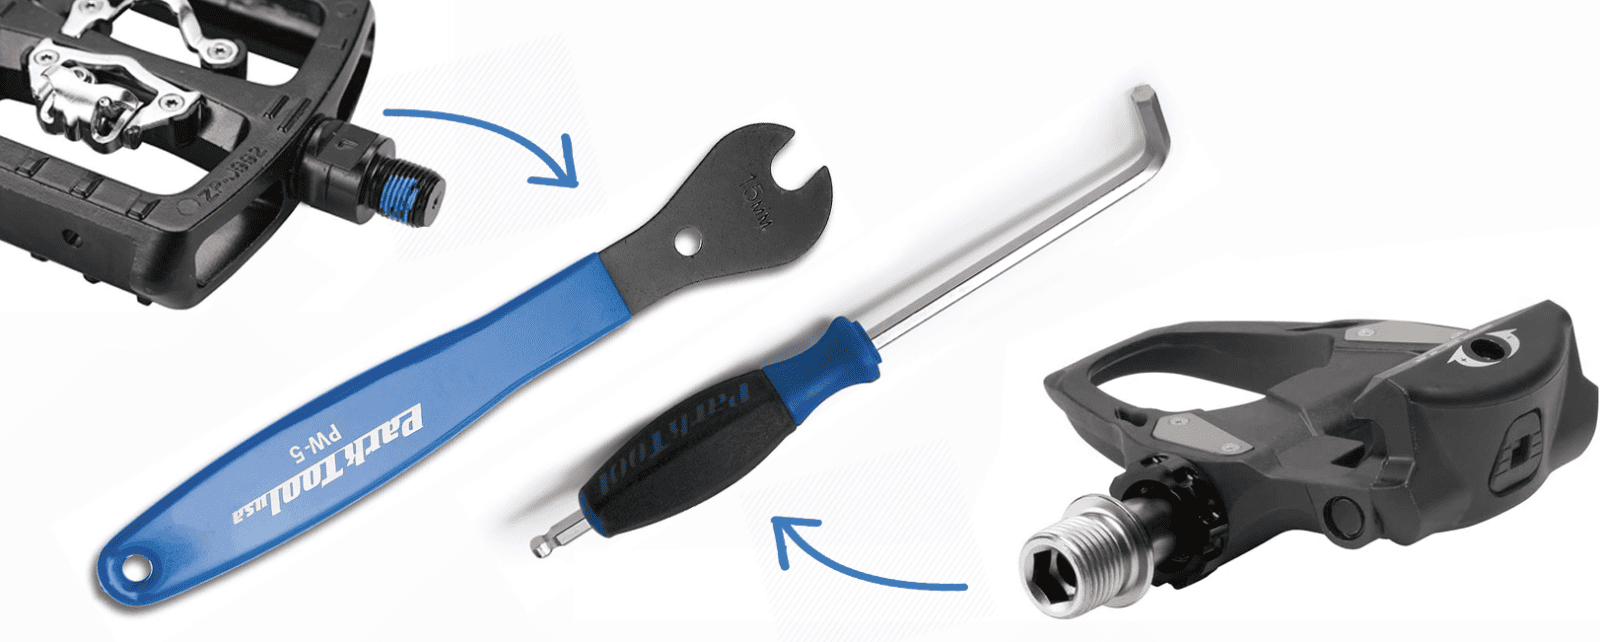
Remember that the pedal locks itself when pedaling. Therefore to remove the existing pedal, you must screw in the opposite direction to pedaling. So, the left pedal undoes clockwise, and the right anticlockwise.
Before installing the power meter pedals, I recommend you add some special grease to the threads, like the Park Tools Polylube PPL1. This will ensure you can always remove the pedals afterward. It will prevent the pedal from getting stuck.
3. Install Zwift
You can run Zwift on a laptop, phone, or tablet. Download the app on the device of your choice and set up an account on Zwift. You will be given a 14-day free trial before being billed. Note that it is a monthly payment that you can stop at any time (see this article on how to cancel a Zwift membership).
4. Pair Zwift to your power meter pedals
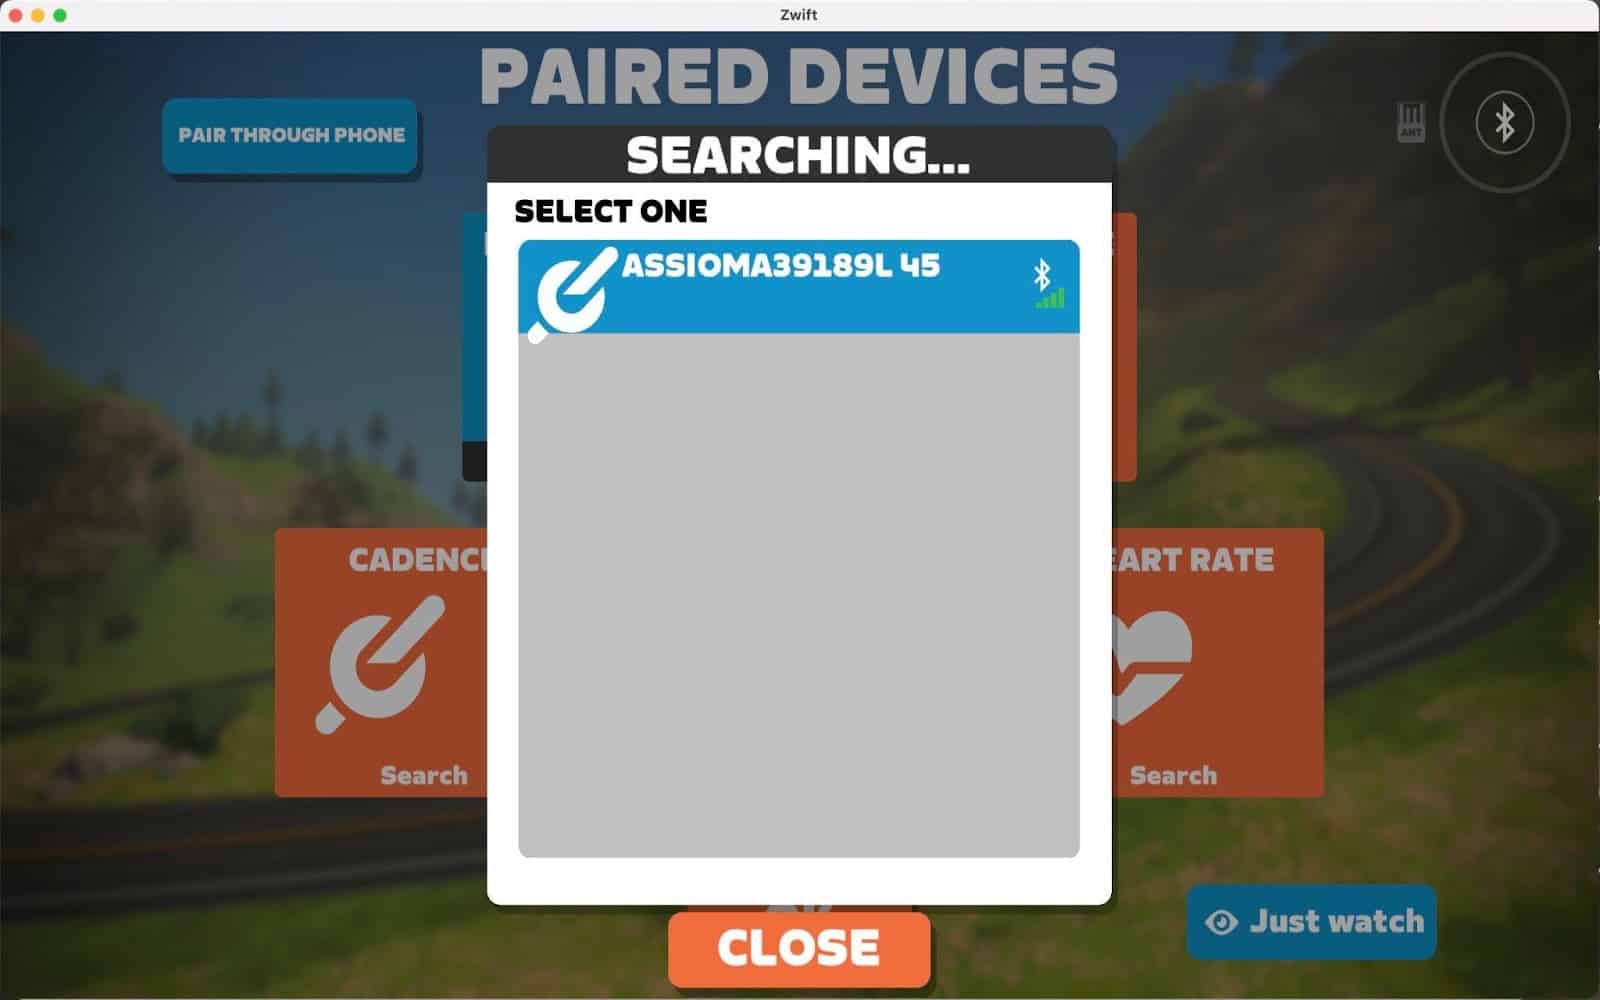
Now open Zwift. Log on and wait for the pairing menu to appear:
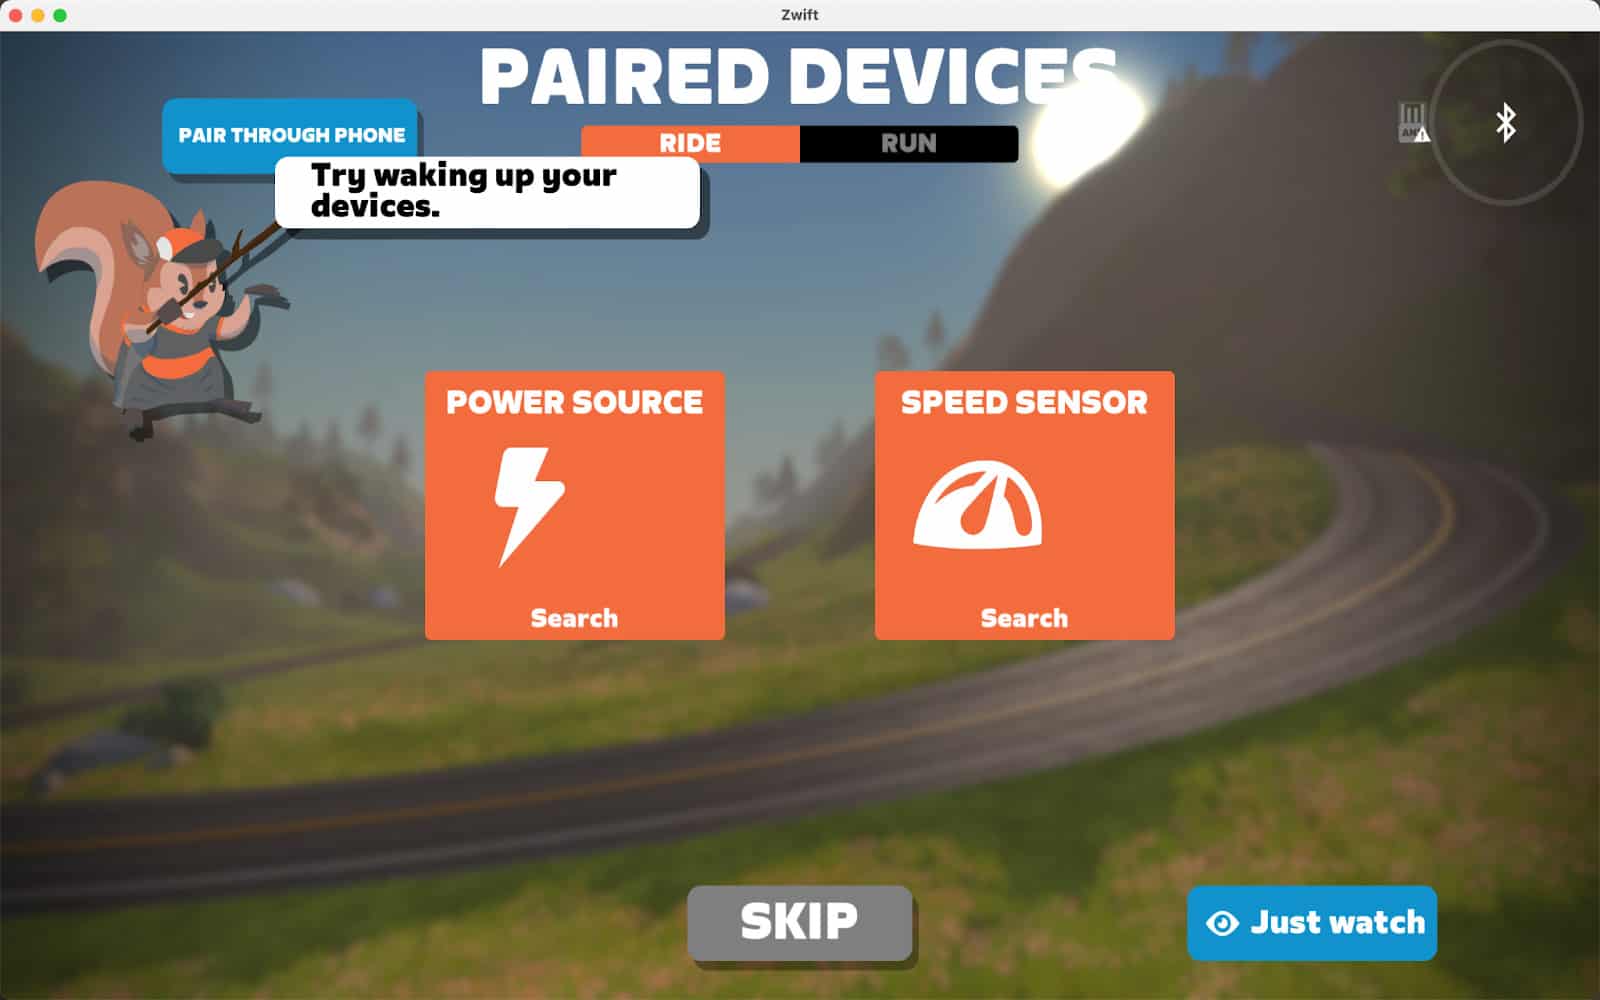
This is where Zwift will connect to your power meter pedals.
Note:
Zwift can connect to devices via Bluetooth BLE and ANT+. However, it depends if the device you are running Zwift on has the ability to receive such signals. For instance, you could have Bluetooth pedals but your laptop does not support Bluetooth BLE (a specific type of Bluetooth), and therefore Zwift won’t recognize the pedals.
I have written a complete article on the topic to help you set up any sensor (Bluetooth BLE or ANT+) on any device (laptop, phone, tablet):
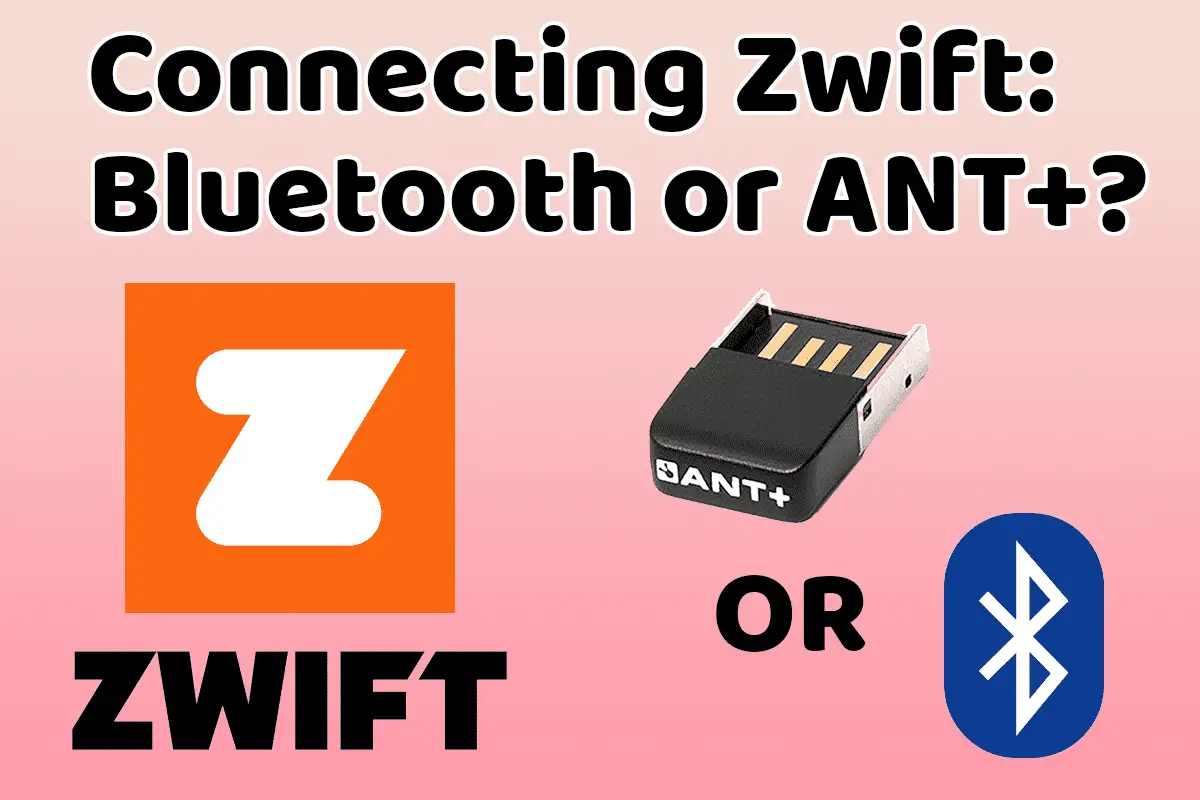
Zwift: do you need an ANT+ dongle or Bluetooth?
Now, all you need to do is click on the box that says “Power Source.” Make sure to spin your crank to wake up the adequately charged power meter pedal. As the Zwift software searches for a power sensor, your power meter pedal will show up on a drop-down menu.
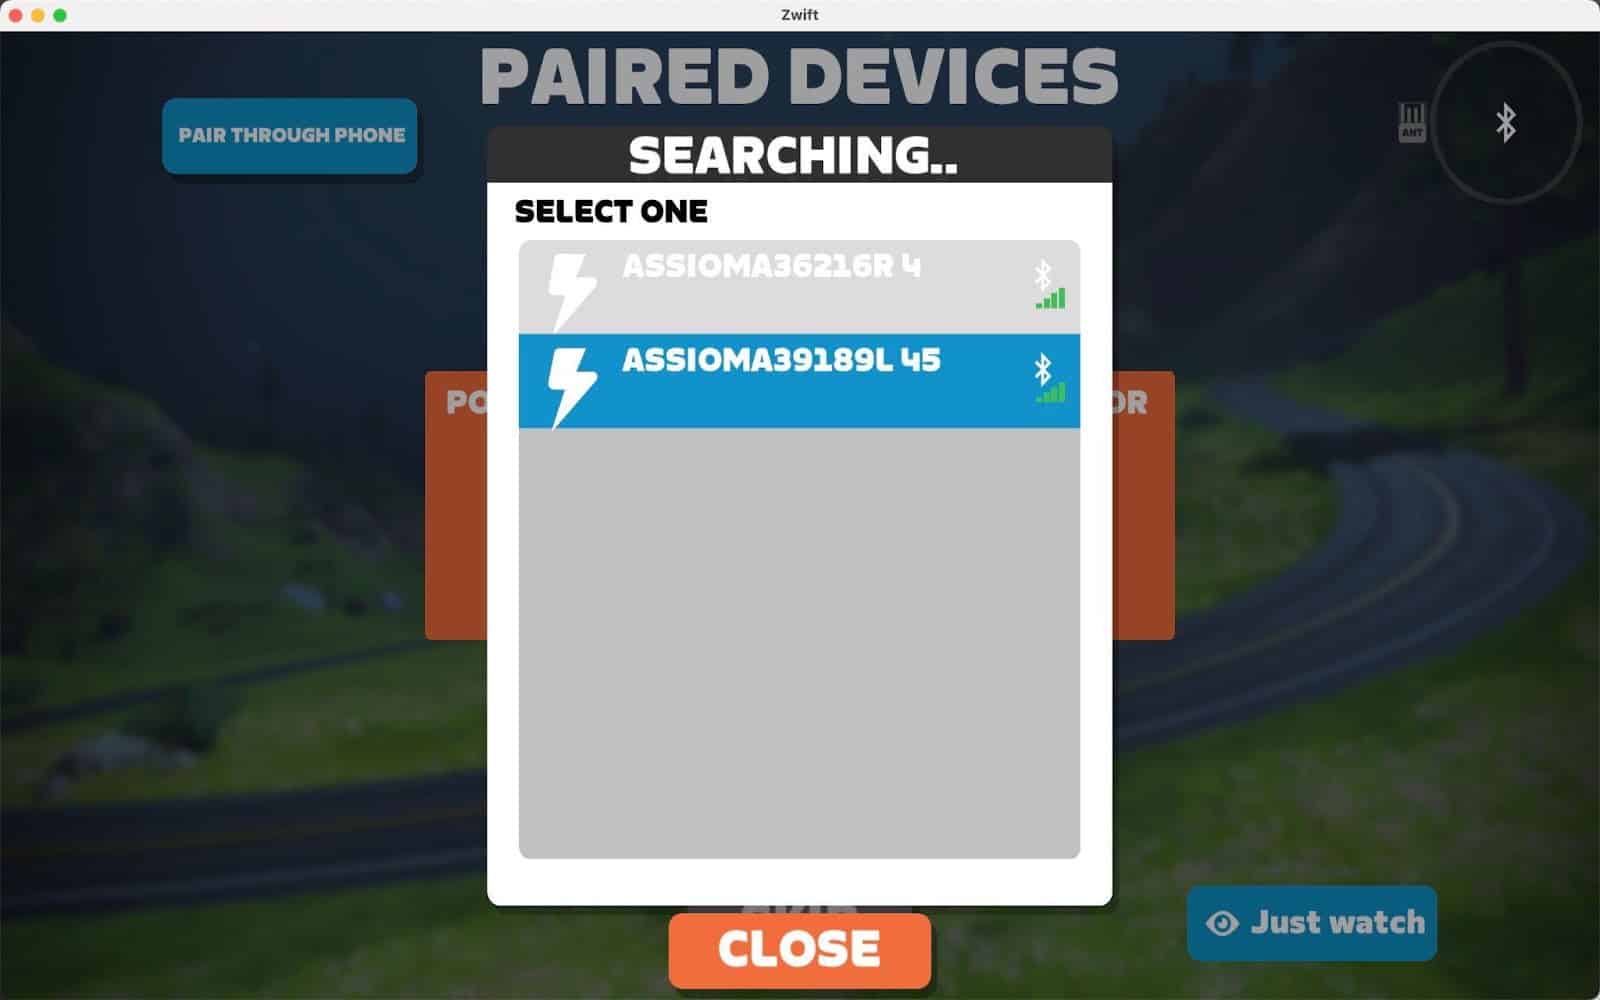
The above screen shows the left and right pedals of the Assioma Duo pedals. The menu instructs you to “Select One” because Zwift is not currently set up for dual-sided power meter pedals. Since you can only select one of the two pedals to read the power from, you will be given a reading in watts that only tells half the story. It will only show the power from one leg, or only half the power you are producing.
The fix is quite easy. Open your dual-sided power meter app (usually on your smartphone), and go to settings. Scroll until you find the option to uncouple the two pedals from each other. During this process, one will be designated as a single-sided power meter pedal (the left one in the case of the Assioma pedals). This will be unnecessary if you are using a designated single-sided power meter set of pedals.
Click on “Cadence” and you will be given the option to use the power meter pedal to track cadence as well.
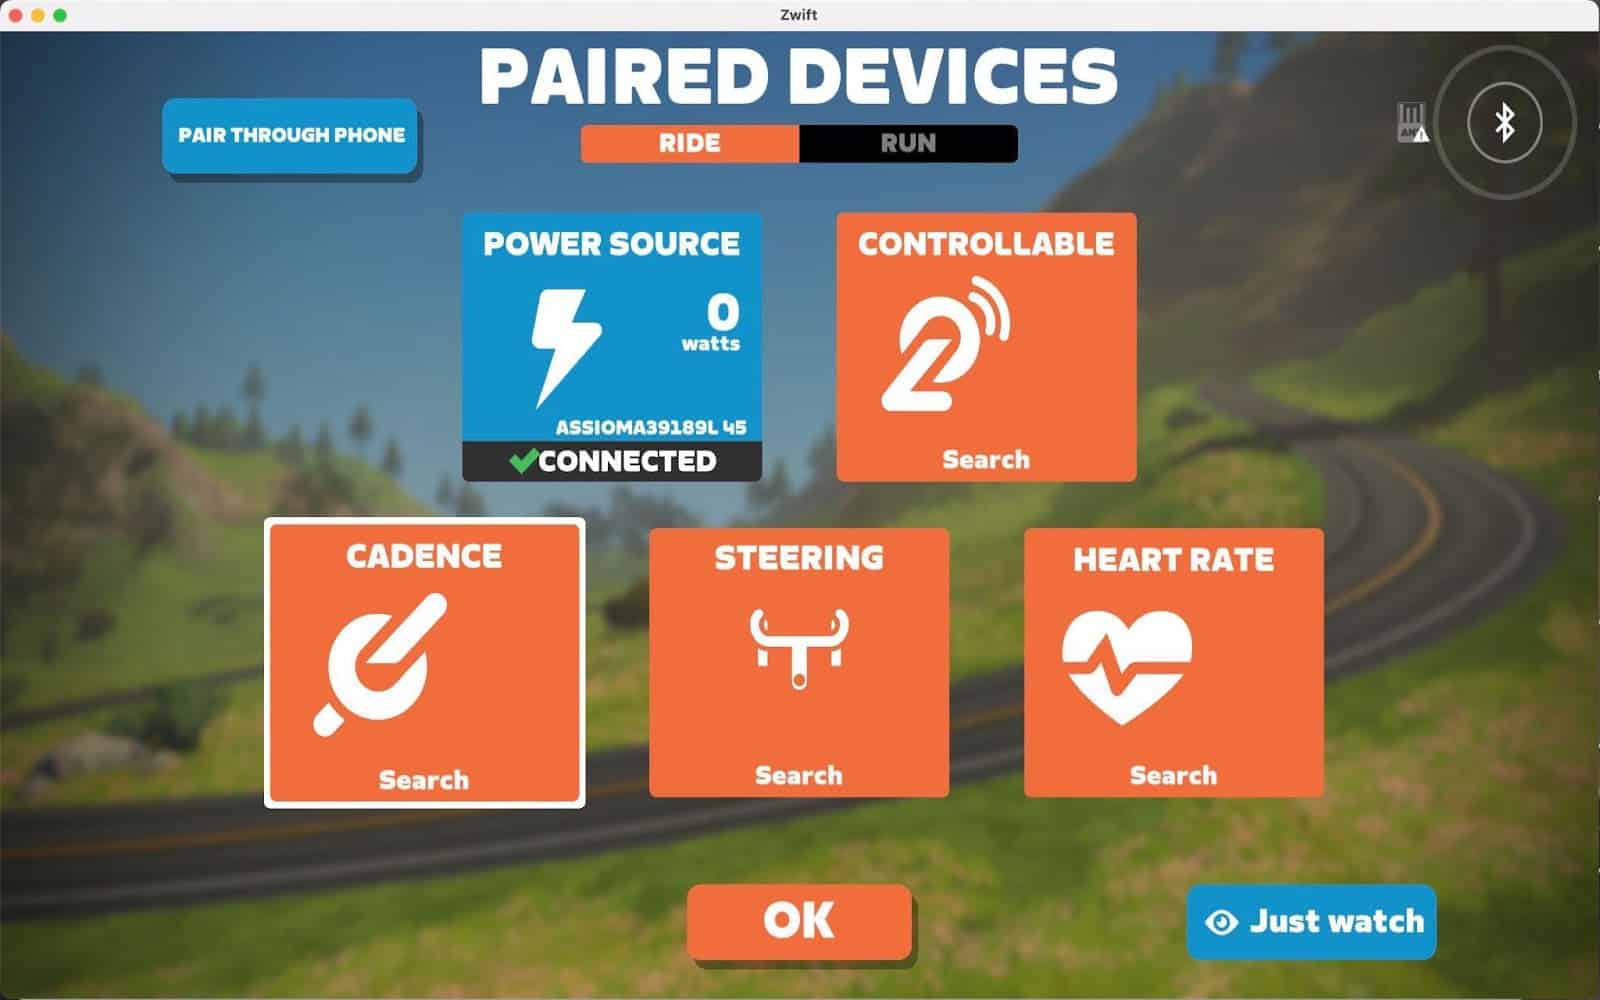
You are all set!
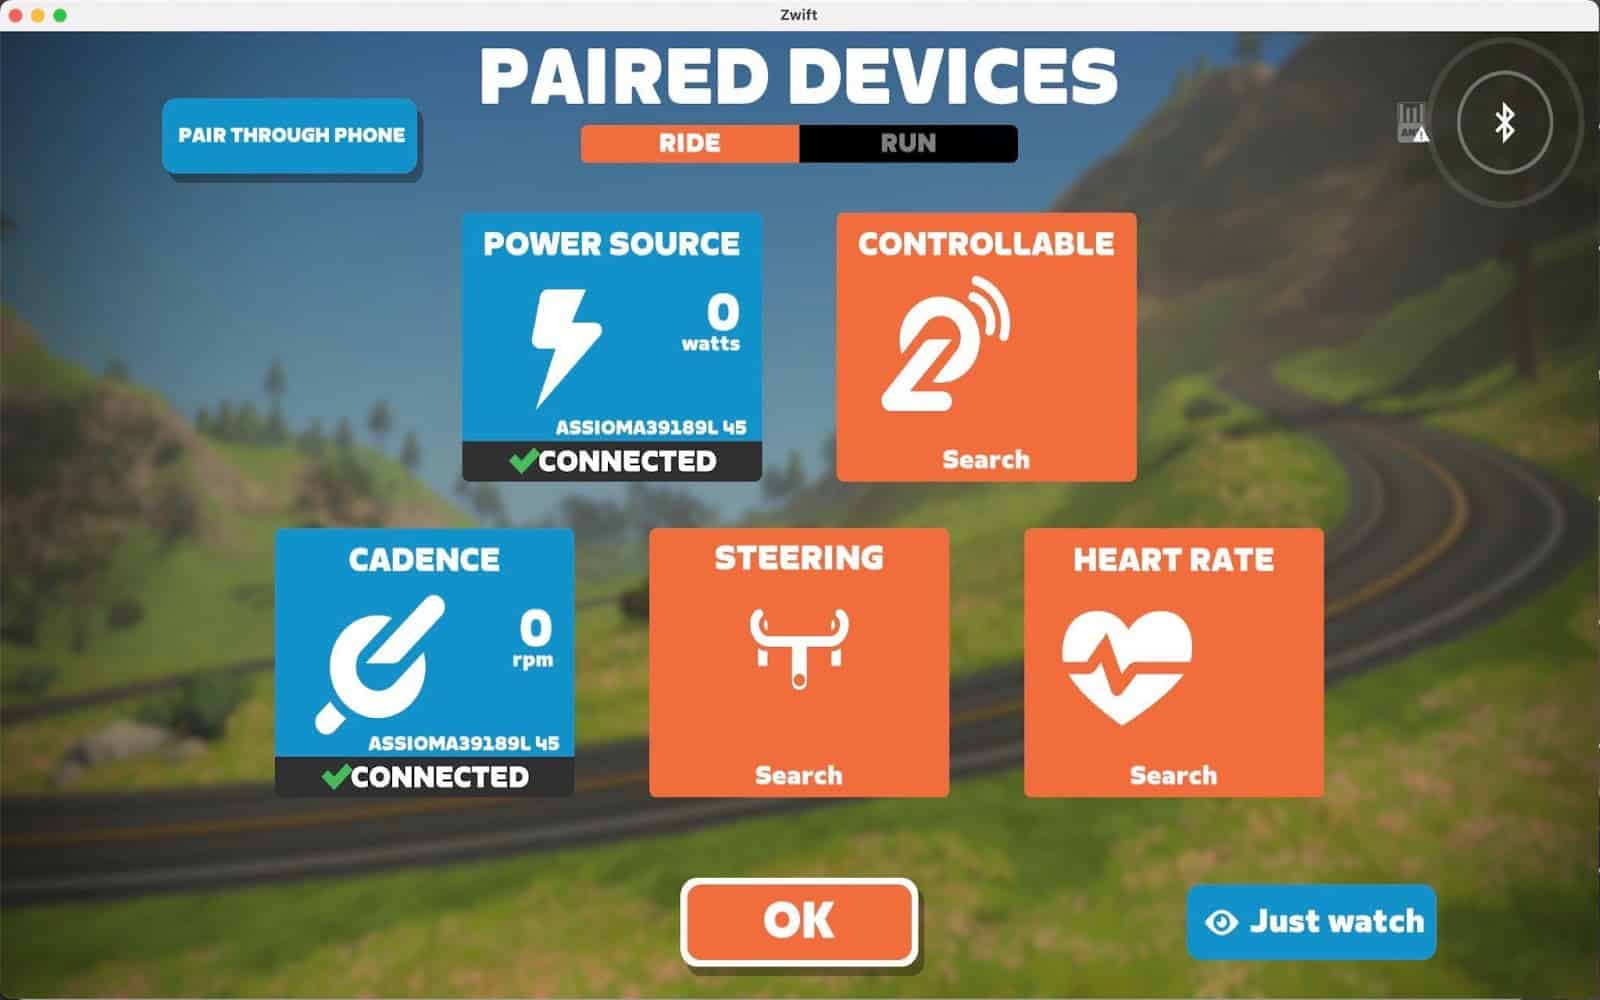
Now that you have set up the sensors and linked them to the Zwift software, you are ready to “Ride on!” – a Zwift expression you are soon to be quite familiar with. Just press OK to access the main menu.
Can you put a speed sensor on a spin bike or Peloton?
Technically, you can put a speed sensor on a spin or exercise bike if there is enough space to fit it on the wheel axle. Speed sensors are very cheap in comparison with power meter pedals. But this solution is not very accurate for riding in Zwift. Let’s see why.
The limitations of using a speed sensor with a spin bike
Using a speed sensor on a spin bike for Zwift has some limitations. While your speed in the game should be ok, your power won’t be. So it all depends on how you plan to use Zwift. If it’s only for its social aspect, then a speed sensor is completely fine! In fact, it’s a way cheaper option than a power meter! Only around $30 to $40.
However, if your aim is to improve your fitness level thanks to metrics, with dedicated exercises based on output power, or even ride a bit competitively, then you will need a power meter instead. Your FTP cannot be calculated properly with a speed sensor for instance.
The power estimated by Zwift, also called zPower, was originally designed for wheel-on trainers, not for spin or exercise bikes. That’s the main reason it does not work well with exercise bikes. If you want to go deeper into the technical explanations, I go into it at the end of the article.
A key metric of Zwift is the w/kg, it’s an indication of your cycling fitness level and is used to categorize people from pros to beginners. With a speed sensor, Zwift will approximate wrongly your power on a stationary bike. There is a good chance it will estimate more watts than you really deliver and thus will place you with people stronger than you (this is based on experience and internet feedback).
You may counter this by increasing the resistance thanks to the bike’s knob. Based on an honest assessment of your fitness level, adjust your resistance knob such that you are able to ride with whatever group you choose, and be able to stay with them while getting a good workout, but not destroying yourself.
Hopefully, the sensation of speed and control of the bike will still be there even without a power meter. If you accelerate on your spin, your avatar will accelerate for instance. So if Watts, FTP, and competitive races don’t matter to you, go for the speed sensor option! You will enjoy the gaming aspect of Zwift with all its social benefits.
How to setup Zwift with a spin bike and speed sensor
That may seem obvious, but first, you need a speed sensor. You will see many tutorials out there recommending to also buy a cadence sensor because that will increase the accuracy of the power estimate. That’s true and even recommended by Zwift support itself, but this statement is true for wheel-on trainers only.
With a spin bike or an exercise bike, I am not convinced a cadence sensor adds much. Indeed the algorithm will try to fit with curves made for wheel-on trainers where the rotation of your pedals (your cadence), and wheel (speed sensor) can be coupled at different gear ratios by changing gears. On the contrary, a spin bike has one fixed gear ratio. More on that later.
So it is up to you, but if you are short on budget, don’t worry about buying only a speed sensor. For the rest of this setup tutorial, I will explain how to configure both the cadence and speed sensors.
Here is how to setup Zwift with a spin bike (cadence optional):
1. Buy a speed sensor and a cadence sensor
I personally recommend the Wahoo speed and cadence combo. Wahoo is a well-known brand in the cycling world while not being that expensive. It costs around $70 for the two sensors.
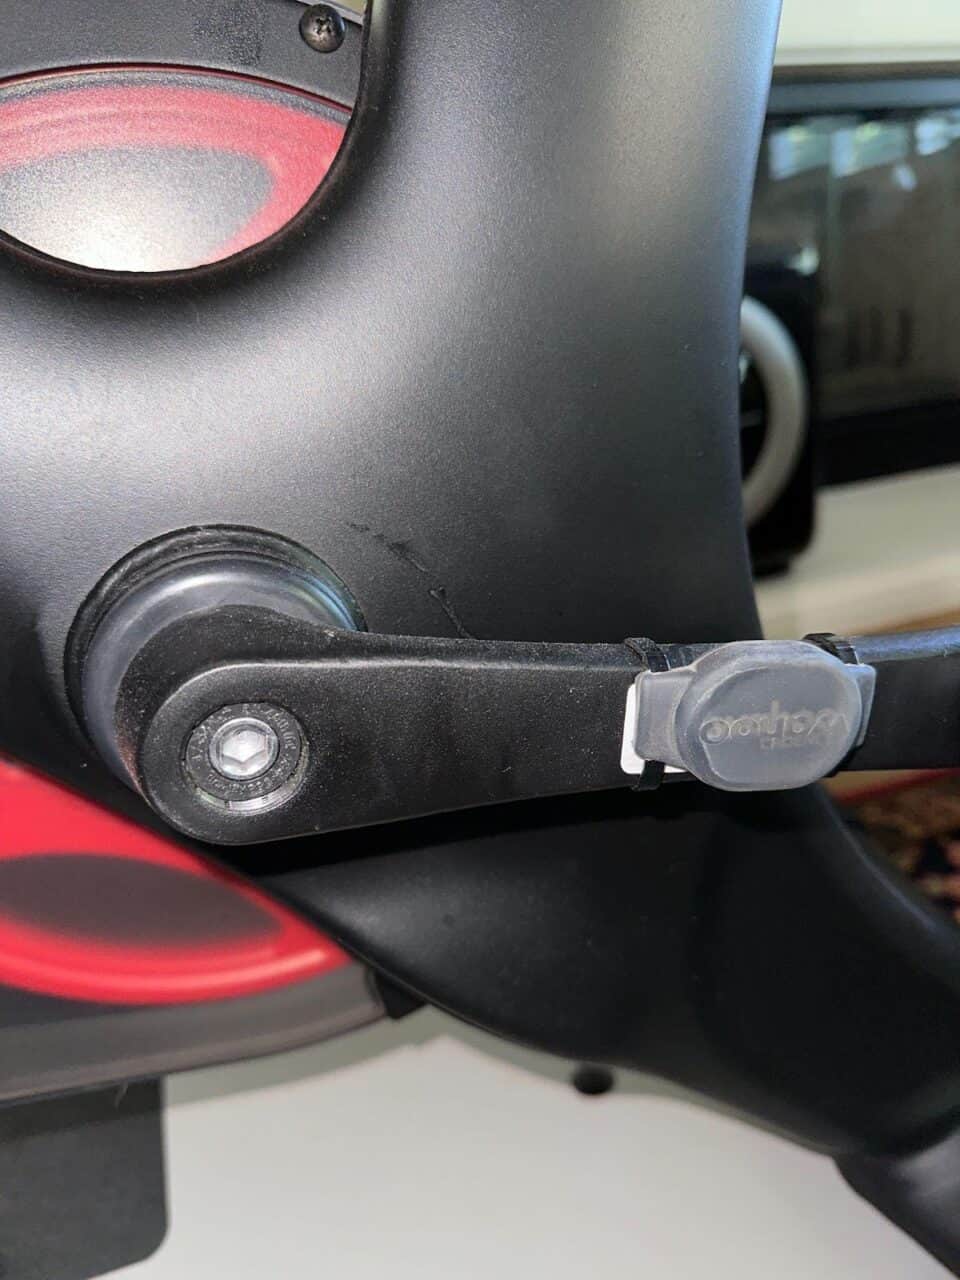
2. Install the cadence on the spin bike crank
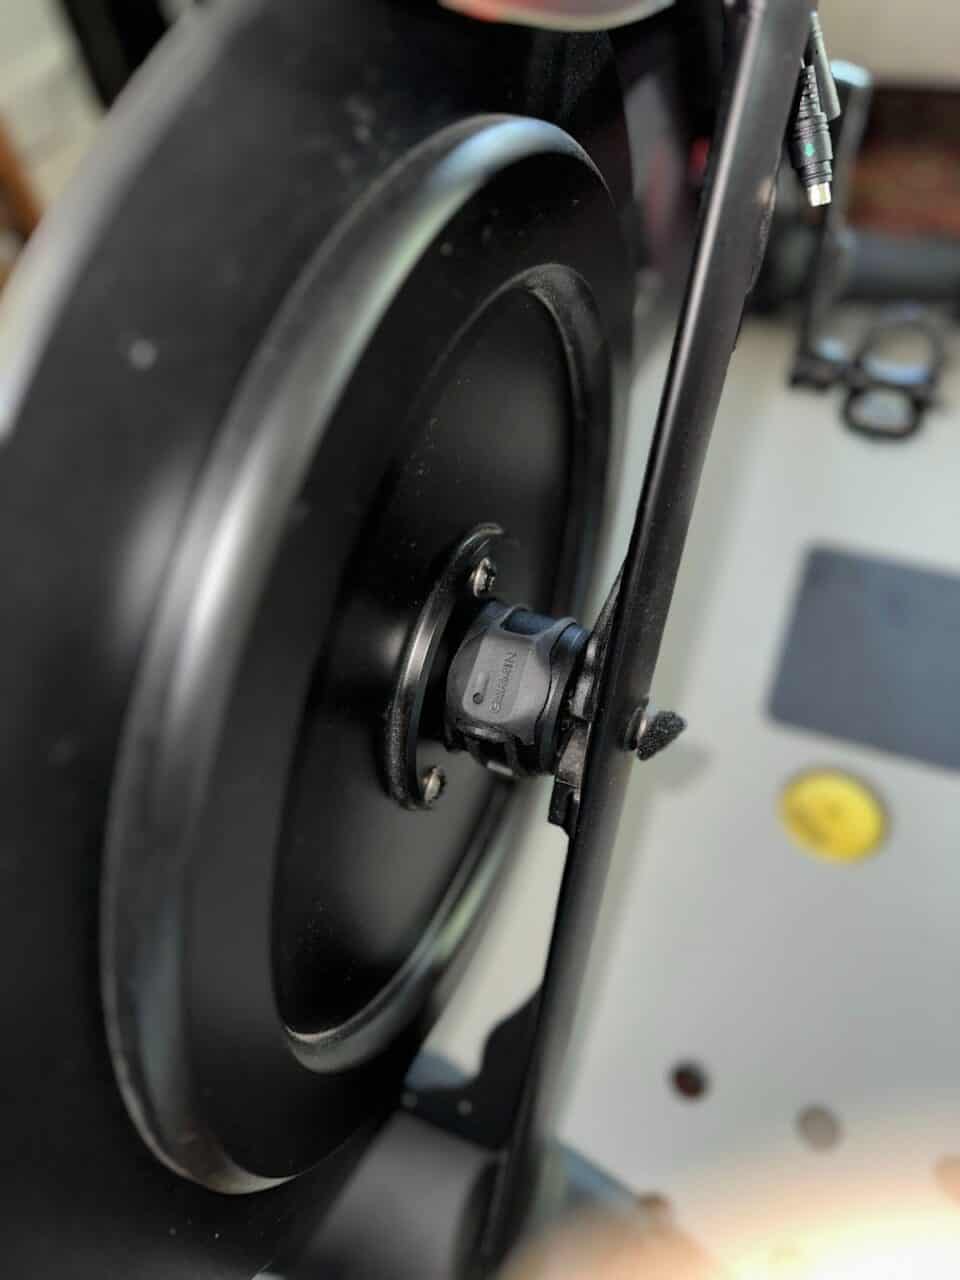
3. Install the speed sensor on the rear axle
4. Open Zwift. Log on and wait for the pairing menu to appear
5. Click on speed sensor
6. Select your wheel-size and speed sensor
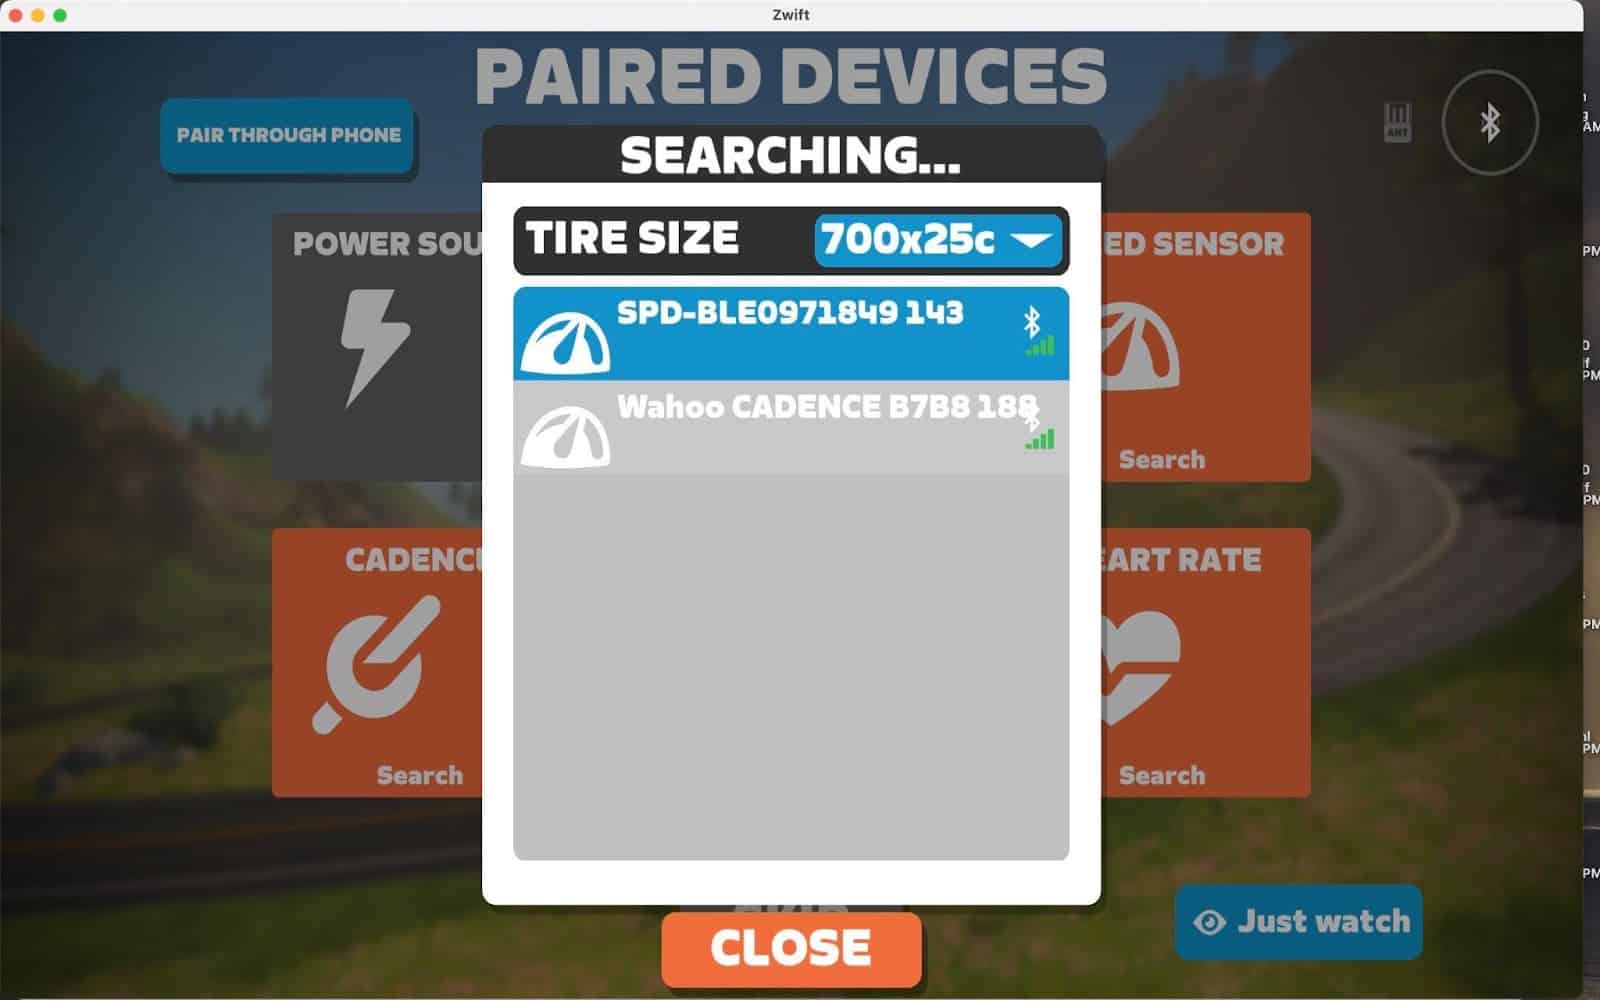
The 700 x 25c wheel size is the default value. It is an average size and will be fine to use for your setup. Choose the speed sensor from the drop-down menu. Notice that the cadence sensor is also coming up as a choice. Ignore it for now. You will be selecting the cadence sensor in the next step.
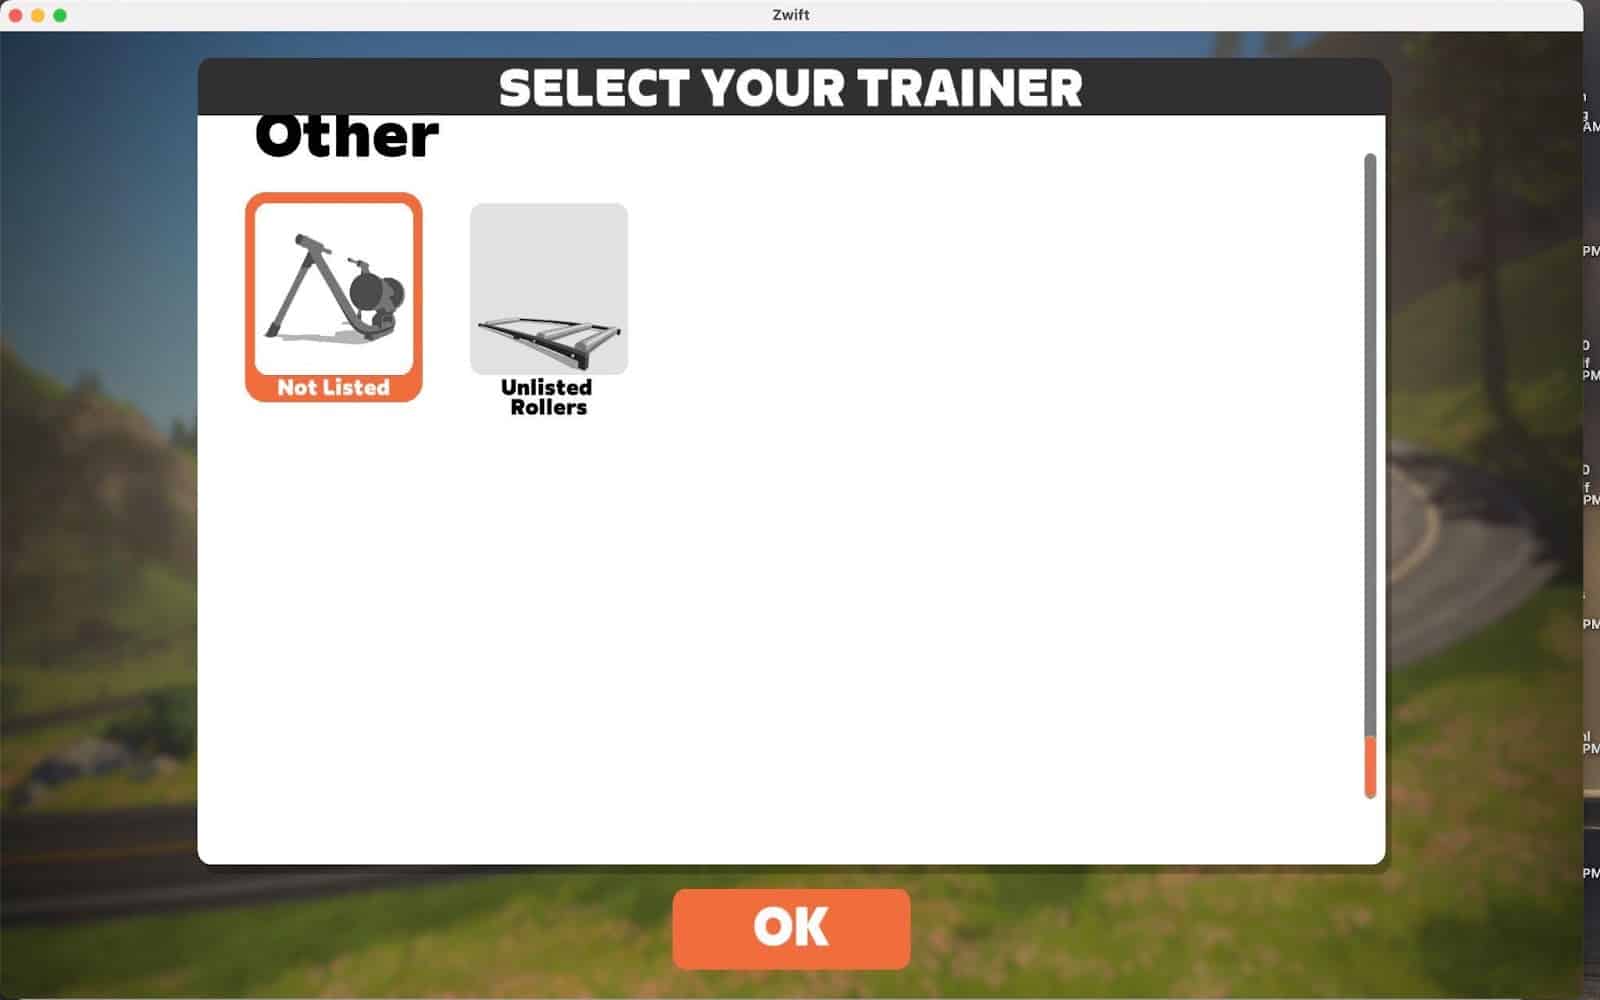
7. Click on the “Not Listed” trainer picture and hit OK.
8. Click on cadence and select your cadence sensor
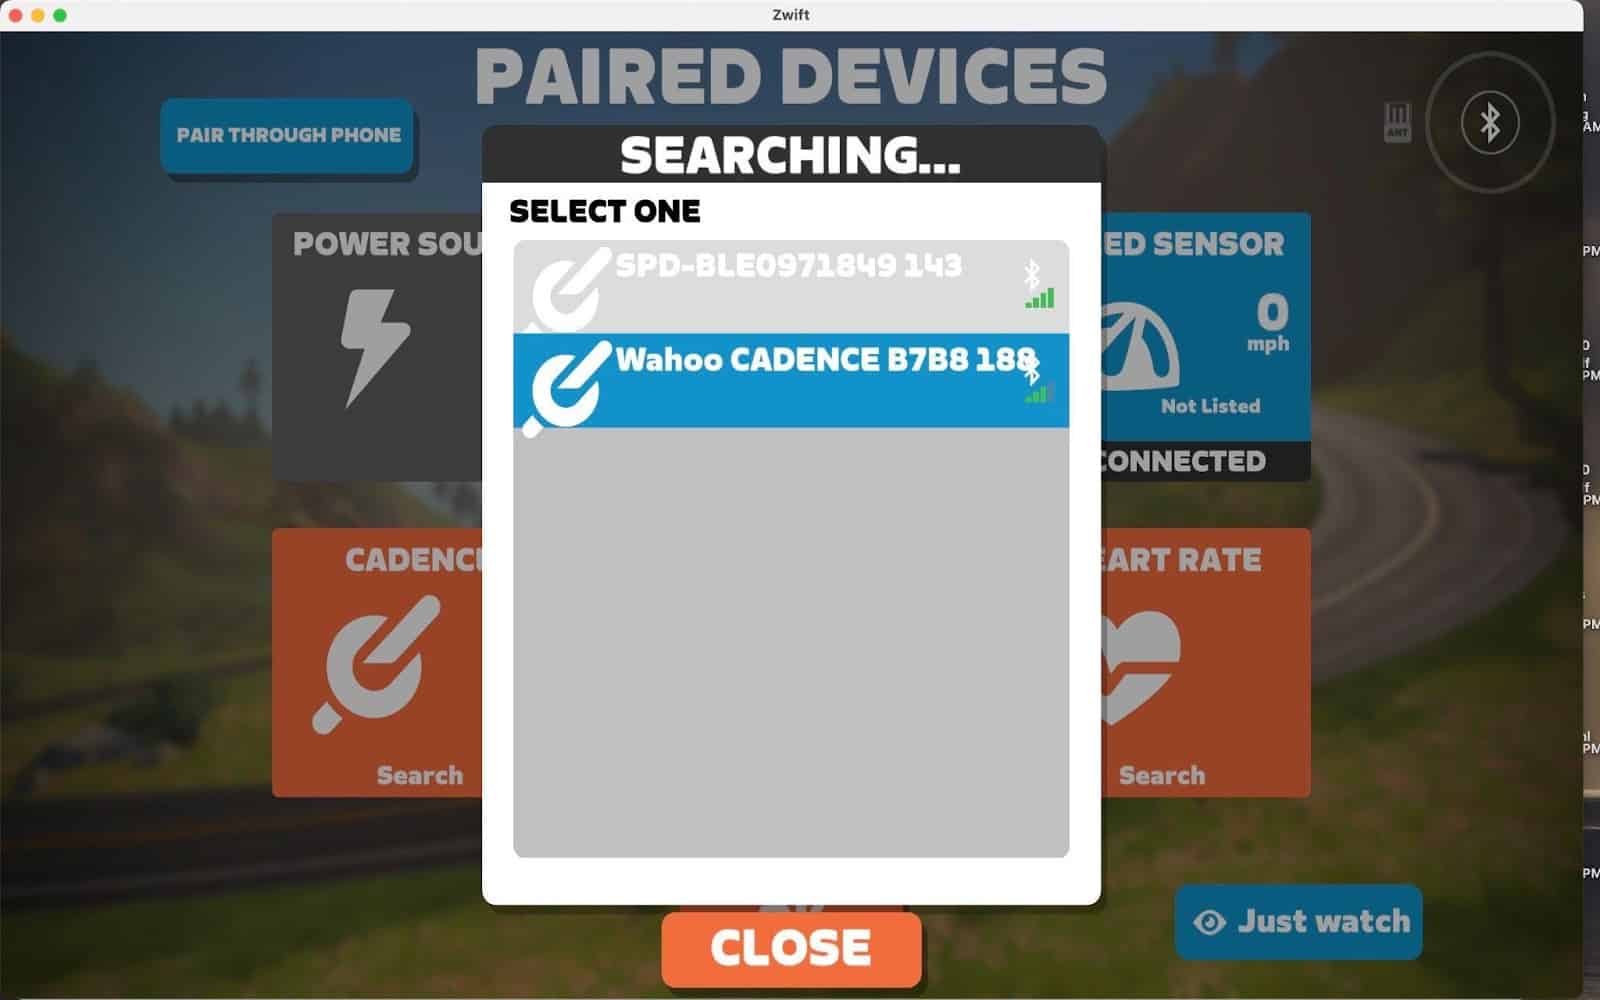
You may notice your speed sensor in the list. Ignore it since you already selected it in a previous step.
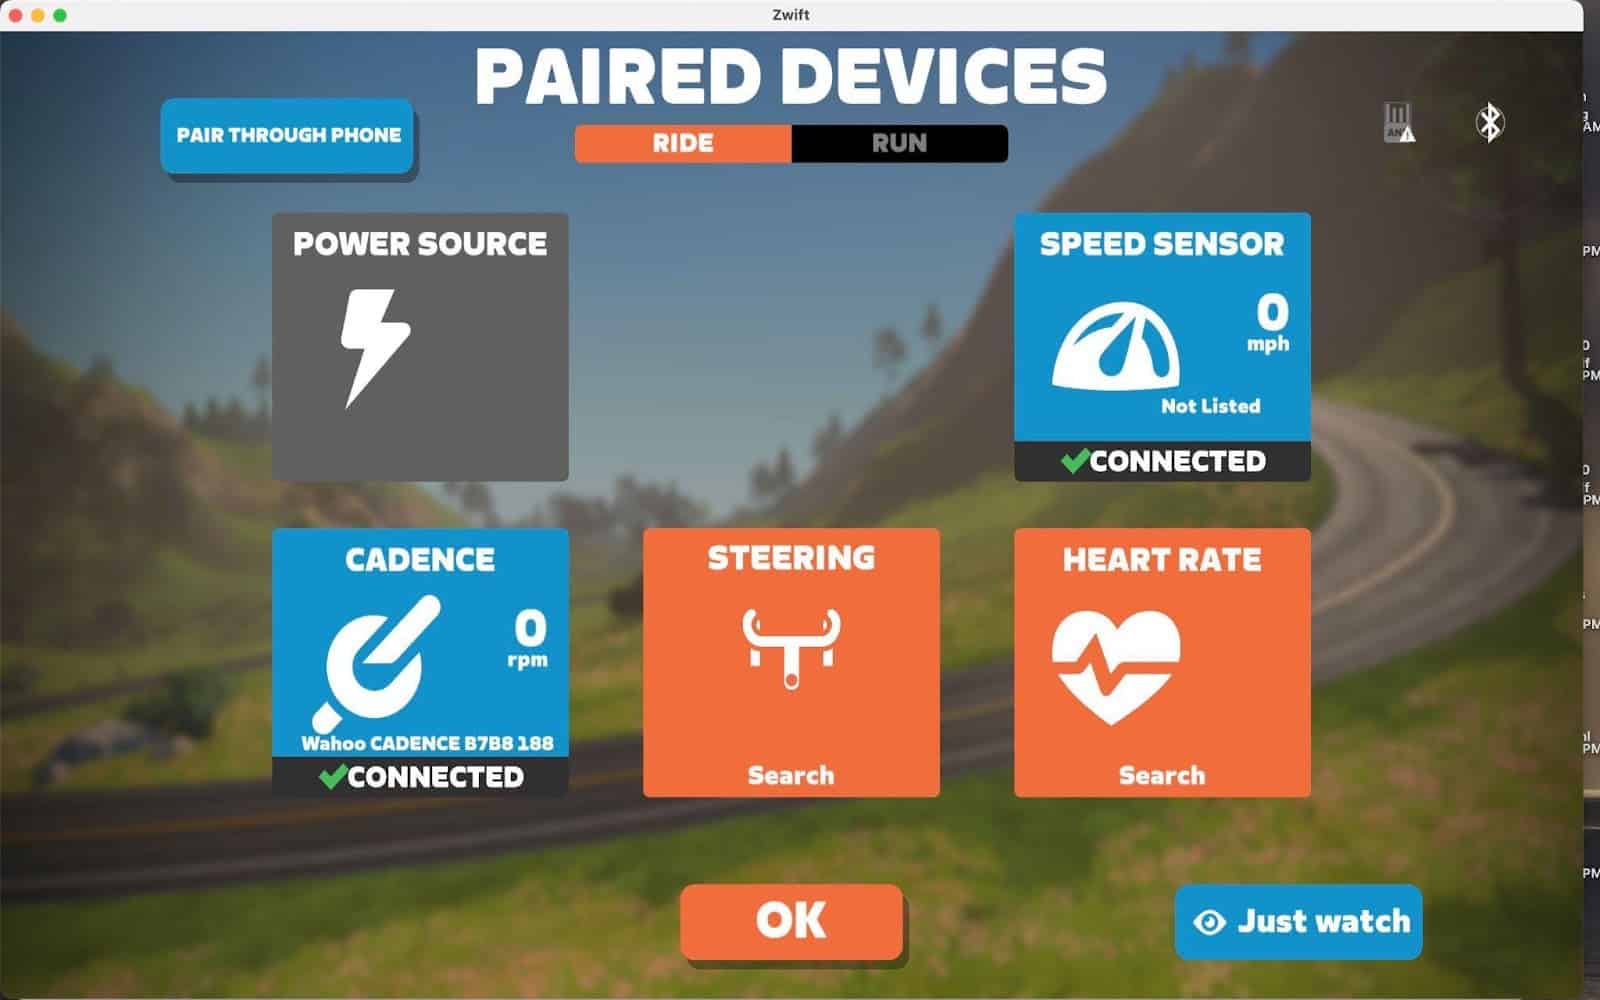
9. You are all set!
You should end up with the following screen. Click ok and enjoy Zwift with your spin bike!
How to improve the Zwift experience on a spin bike?
Riding Zwift on a spin bike can feel a bit uncomfortable due to saddle sores. To improve the experience, a solution is to add a rocker plate underneath. It will allow the bike to move in different directions, reducing the friction on your sit bones.
Why are you experiencing saddle soreness on your spin bike?
Indeed, if you have been riding a spin bike for some time, you may be familiar with the fact that the saddles are much more padded than what road cyclists are riding on. For both fitness and comfort, spin classes often incorporate multiple riding positions throughout the session. Riding in different positions certainly promotes greater fitness by engaging different muscle groups, but changing your position is also necessary because of the static nature of an exercise bike.
As you pedal, your hips move side to side over a non-moving saddle. These small but frequent displacements of your sit bones in relation to the saddle create friction. This friction in turn creates discomfort which can lead to saddle sores and possibly a shorter workout than you’d like.
When cycling outdoors, you can last hours riding without experiencing any pain. Why is it different to riding indoors?
=> Simple: The bike rocks left and right with every pedal stroke. The cyclist is resting on a saddle with minimal padding that conforms to the location of the sit bones. The use of padded shorts on top helps release the pressure. The pressure applied on the sit bones varies slightly from one side to another when the bike rocks. Thus, friction is greatly minimized and the pressure is not constant on your sit bones.
Solutions to reduce saddle soreness on a spin bike
One solution is to do short workouts on the spin bike like high-intensity interval training (HIIT) sessions, or alternate frequently between sitting down and standing while pedaling. But another solution is simply to use a rocker plate with side-to-side motion to reduce the friction on your sit bones and ride freely.
A good example of a rocker plate for a spin bike is the Velocity Rocker Spin from velocityrockers.com.
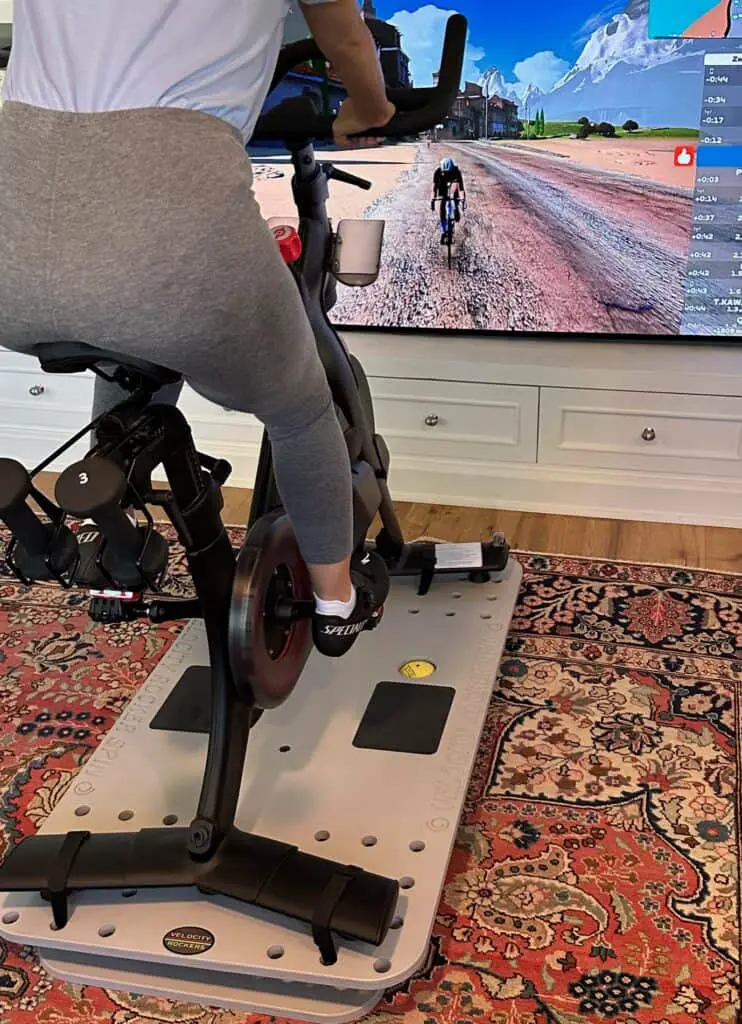
It has been specifically designed to handle the weight of your spin bike (even heavy ones like the Peloton bike) and make sure the bike can be secured correctly thanks to the honeycombed design.
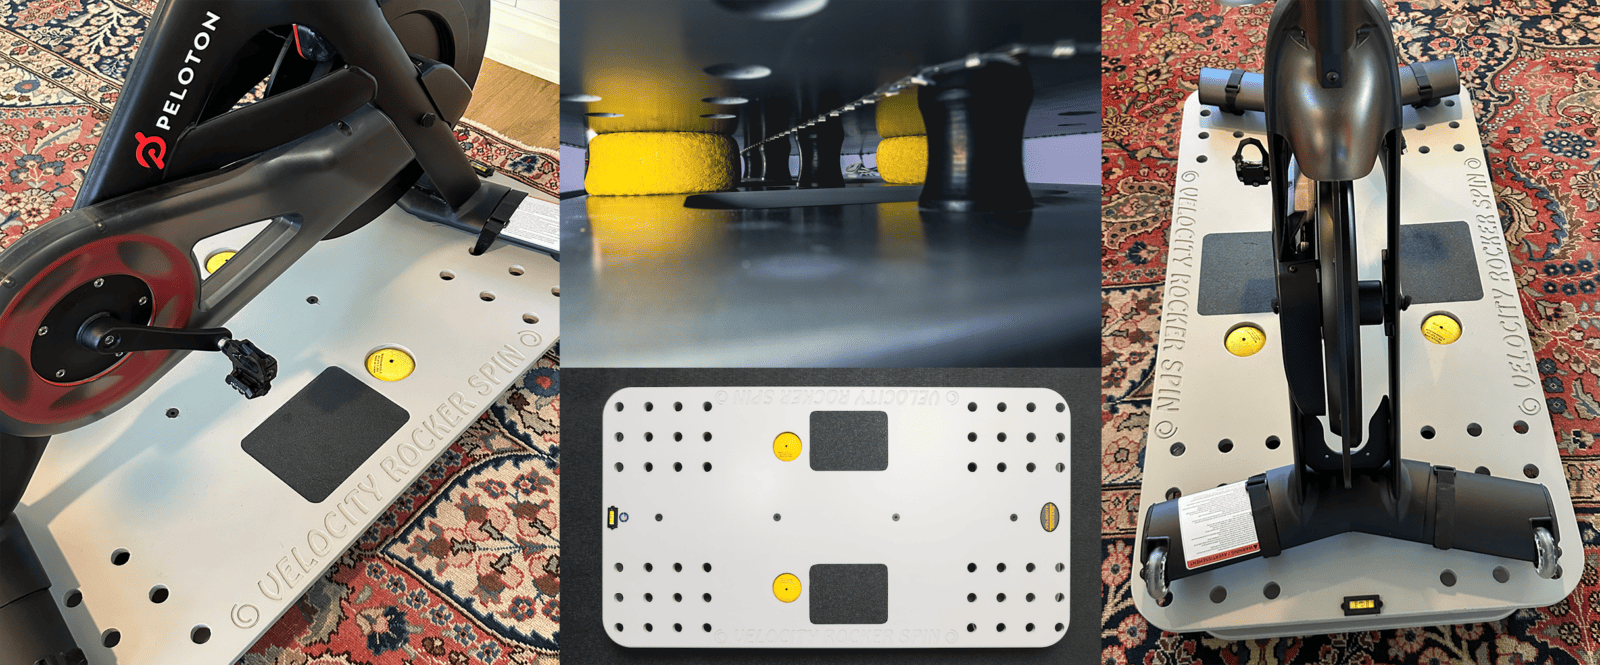
The Velocity Rocker Spin is a rocker plate I highly recommend if you own a spin bike, an exercise bike, or even a Peloton. You can buy it here: Velocity Rocker product page.
Why speed sensors don’t work well with spin bikes
The main drawback of connecting with a speed sensor is that the power output (wattage) is not directly measured. Instead, Zwift will estimate power based on the wheel speed that is obtained thanks to the speed sensor. But it can’t take into account how much resistance the spin bike has and therefore doesn’t know how hard you are working to make the wheel spin.
Imagine if you are going uphill outside on the road, you are using a lot of power to turn the wheel relatively slowly. If you are going flat, you are using much less power to spin the wheel faster. A speed sensor can just estimate speed but not power.
Case of a wheel-on trainer
On wheel-on trainers, Zwift can get a good hold of this resistance by adding a cadence sensor. Let me explain how. First, imagine someone going at a given speed at a specific gear ratio. Let’s imagine you spin your pedals (=cadence) at 80 rotations per minute (RPM) and that your wheel turns at 100 RPM. The gear ratio here is 1.25. Let’s say someone gives 160W of power to achieve this.
| Case | Pedals rotation | Wheel Rotation | Gear Ratio | Estimated Power |
| #1.1 Baseline | 80 RPM | 100 RPM | 1.25 | 160W |
Now let’s imagine this person doesn’t change any gear and decides to pedal harder, in other words giving more power. In this case, the pedals’ rotation increases and so does the wheel. But as the person did not change any gear, the ratio between the two will still be 1.25.
| Case | Pedals rotation | Wheel Rotation | Gear Ratio | Estimated Power |
| #1.1 Baseline | 80 RPM | 100 RPM | 1.25 | 160W |
| #2.1 Same gears | 100 RPM | 125 RPM | 1.25 | 200W |
As Zwift is measuring both the pedals and wheel rotation thanks to the cadence and speed sensor, it knows that the gear ratio (= speed sensor RPM / cadence sensor RPM) hasn’t changed. So has the rotation has increased, the only possible explanation is that power has increased.
Now imagine that the person changed gears (reminder: with a wheel-on trainer you are using a real bike!). He now uses a harder gear in order to achieve the same speed, so his gear ratio increased:
| Case | Pedals rotation | Wheel Rotation | Gear Ratio | Estimated Power |
| #1.1 Baseline | 80 RPM | 100 RPM | 1.25 | 160W |
| #2.1 Same gears | 100 RPM | 125 RPM | 1.25 | 200W |
| #3.1 Harder gears | 80 RPM | 125 RPM | 1.56 | 250W |
He is achieving the same speed as case #2.1, but by pushing harder on the pedals. His power has again increased. Here Zwift knows the power has increased because despite having the same wheel rotation (information provided by the speed sensor), the gear ratio has increased (indeed pedal rotation has decreased as provided by the cadence sensor).
First conclusion: You can see that having only a speed sensor is not sufficient. A speed sensor will output the same value of 125 RPM for cases #2.1 and #3.1 whereas the power is radically different!
Case of a spin bike
Now a spin bike works relatively differently. It has a fixed gear ratio since it uses a classic belt drive. The resistance that you can change thanks to the knob works like breaks that pinch a disk attached to the pedals. It does this either by pads or magnets.
So here is what happens with a spin bike if I try to achieve the same power output as in the wheel-on trainer scenario:
| Case | Pedals rotation | Wheel Rotation | Gear Ratio | Estimated Power |
| #2.1 Baseline | 80 RPM | 100 RPM | 1.25 | 160W |
| #2.2 Same gears | 100 RPM | 125 RPM | 1.25 | 200W |
Here I did not change the knob resistance but pushed harder on the pedals (pedals rotation has increased), so power has increased. Zwift can manage this case.
Now let’s change the resistance knob to an easier setting. In other words, I can achieve faster rotations by pushing less on the pedals:
| Case | Pedals rotation | Wheel Rotation | Gear Ratio | Estimated Power |
| #2.1 Baseline | 80 RPM | 100 RPM | 1.25 | 160W |
| #2.3 Lower knob resistance | 120 RPM | 150 RPM | 1.25 | 250W (wrong!) |
Here the gear ratio hasn’t changed (it can’t with a belt) but the wheel rotation increased, so Zwift interprets that you are pushing harder and increases the estimated power. It is completely opposite to what is happening!
Conclusion: With a spin bike or a stationary bike, Zwift can tell if you are pushing harder or lighter only if you keep the same knob resistance at all times.
If you have the resistance knob set to very little resistance your speed reading will be outrageously fast as you spin the pedals and flywheel quickly. You will pass other riders in the game as if you were riding a motorcycle. By the same token, if your resistance is high, you’ll be trailing the other riders while huffing and puffing. In regards to racing with this setup, it’s a big faux pas! Don’t do it.
The nice tables and scenarios I have created above are very similar to what Zwift did to create their zPower curves by wheel-on trainer models. To achieve this, they simply installed a bike with a cadence sensor, a speed sensor, AND power meter pedals and did some testing in a lab.
The purpose here is to have the real power measured by the pedals and have all the pairs of cadence and speed sensor values that correspond to that power. You can therefore build empirically a table that converts the speed and cadence values to the right power measured in the lab.
What is interesting, is that we can do a similar lab testing to know how wrong the power estimated by Zwift is with a spin bike. And that’s exactly what ZwiftInsider did!
You can find their study here, where they installed a power meter + a cadence and speed sensors on a spin bike and ran Zwift. This way they have the real power from the pedals and the estimation of power from Zwift.
The difference is shocking, the estimated power from Zwift for a spin bike can be wrong by 50 to 150W!
So definitely, a speed sensor cannot be used on an exercise bike to estimate your power correctly. So you can forget about FTP and competitive rides!
Share on: